Grundtal Hanger Airport Extreme Wall Mount

rsz_photo_3

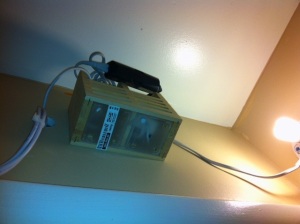
In order to make way for a nursery, I relocated my home office. This created problem where my wireless router was no longer located central place in the house. I found that my coat closet in hallway was the exact center. That made it the ideal place to mount a router. I had power and could easily run ethernet from the coat closet to the mounted router. I set out to find a mount.

I looked for retail mounts, but I had a real problem with spending $40-$50 for the available plastic mounts. However, the Grundtal hangers 300.612.47 that I had installed on the inside of the coat closet looked ideal for my purpose.

http://www.ikea.com/us/en/catalog/products/30061247/

They looked great and fit perfectly in the channel around the Airport Extreme. The Grundtal hangers also allowed space behind the router for wires and airflow. I created a template by tracing the airport on a sheet of paper and measured where I thought the mounts should be located. I made a pdf version of the template and it can be downloaded below.

rsz_11photo_1

Template pdf file: AEBSmount

Instructions

Items Needed:
4 Grundtal Hangers, Ikea item no. 300.612.47 ($3.99 for each 2 pack)
Drill and bit for wall anchors
Screwdriver
5 tacks
Template
Spirit Level
Fasteners (wall anchors) for the Grundtal hangers

Place the template on the wall. Allow for room from the to let router slide into the mount. Place a tack only in the center.
Use spirit level to straighten the template on the wall.
When level place tacks in the center of each of the four circles on your template.
Remove tacks and template from wall.
Use the four tack holes from step two to locate where to drill the holes for the fasteners.
Install Grundtal Hangers.
Wire up router and slide it in position.
All done.

Update: 4/17/2013
Re: signal and orientation of router. It’s been pointed out that the router is not in its designed orientation. This is supposed to affect its signal negatively. My personal experience is to the contrary and the signal has improved. I suggest a dry run without permanently mounting first.

photo

Repairing a non Responsive Touchscreen of an Asus Memo Pad HD7 (me173x)

LnBJAWxu07b2FAoC_500

My daughter’s beloved Asus HD7 stopped working today. It is out of warranty and I really rather not go through the expense of replacing it. I decided I had to crack open the case, but of course. The tablet is very similar to the ASUS HD7. Removing the back cover is similar to the first couple minutes of this video: Google Nexus 7 Tablet Repair Directions | DirectFix

*** Remember to remove your SD card before opening the case, you will destroy your SD slot otherwise.***

Do this at you own risk, I take no responsibility if you screw it up and trash your tablet. You probably should let the battery die first also.

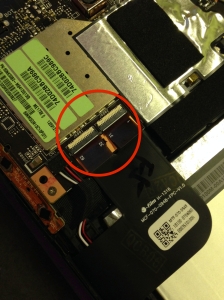
Once inside locate the connectors circled below:

photo 1


Cut up a store loyalty card or something similar to fit the width of both connectors. Slide it under the handle tabs (my terminology) of the connector. Push toward the logic board connectors until the white lines on the flat cable are as close as the can get without overly forcing it to the board connectors.

photo 2

If you use reckless abandon like i prefer and didn’t let the battery down (bad idea BTW)
you can hold down the power button to reboot (the pen is pointing at the right button)

photo 3

Prevention: You really probably should use a high temp tape, I just used transparent tape to prevent it from sliding out again

photo 4

This is where I put my tape. It is on the battery (which is why a high temp tape is recommended)

photo 5

If these connectors a open close them carefully as seen in the picture below. You may find you need to open these with you fingernail or plastic pry tool, especially if the ribbon cam completely out. They open from the top side in this image. Please be careful and remember to close them when finished.

IMG_0097

Good Luck. Hope this helps someone.

Turn an an old rooted Android phone into a portable direct connect Airplay audio reciever

ImageImage

Turn an an old rooted android phone into a portable direct connect Airplay audio reciever

*****Most recent AirPin(Pro) update has broken this hack on my Kyocera, but reportedly does work on some other Androids *******
I have a rooted Kyocera Rise (mine is not activated) that I use like an iPod Touch. I was looking into Airplay solutions for my car and other portable uses. I tried playing with a Raspberry Pi, but the lack of battery and a noisy audio port made me abandon it for a portable solution. I thought a portable Airplay solution should have the following things;

1. Able to recieve an Airtunes stream
2. Able to create a wifi network
3. Self-powered by battery
4. Capable of being used with car charger too

A rooted Android phone with Android Os 4.x fits the bill perfectly. I picked up a prepaid Virgin Mobile Kycocera rise for under $30 a while ago at Target. I figured it would work as an internet radio at home, as an ipod or just something for tinkering. I found that there were various Airplay apps on the on Google Play. Please note: Airplay in a car can be unreliable you will get skips and stutters in populated areas. I believe this is because the wifi networks around you can interfere with the car network (driving through a wifi network on the same channel)

Things needed

1. Rooted Android phone (I have Android 4.0.4)
2. AirPin(Pro) or AirPin(free) ‎from the Google Play store. I couldn’t get Airplayer or Airbubble to work. The AirPin(Pro) is actually pretty incredible. You should take a peak at it; if the Kyocera Rise had a video out it would be an awesome to use that app.
3. android-wifi-tether apk available at http://code.google.com/p/android-wifi-tether

You need these two apps:
\Image

How to do it.
1. Install Airpin app on the android phone. https://play.google.com/store/apps/details?id=com.waxrain.airplaydmr&hl=en Setup the and app check the Airtunes/Airplay boxes. You can also give the service an Airplay name with Device Nickname (I named mine “Rise”). Start up service.

Image

2. Dowload and install android-wifi-tether apk http://code.google.com/p/android-wifi-tether/downloads/list
3. Set up wifi tether app

ImageImage

4. Start a tether session on the Android
5. Connect iPhone to the Androids wifi network you just created.

Image

6. Once connected on the iPhone go to Settings>Wi-Fi, Click on blue circle with the white arrow to configure your connection to the Androids phone’s network. Write down the “IP Address” and “Subnet Mask” in the DCHP (you only need those two items).

Image

The goal is to get rid of the “Router” and the “DNS” fields. To achive this goal, press “Static” and enter the “IP Adress” and the “Subnet Mask” only.

Image

7. Now you should be connected to the Andoid’s wifi network (check in the iPhones WiFi settings) but you’ll see 3g in the top of you phone.

Image

8. Plug your Android into you car’s Aux port. Open your favorite iphone apps and send an Airplay stream as usual.

Image

Enjoy.

*Caveat – The Kyocera rise is terrible with lock screen audio, I have to lower my brightness and stop sleep. Airplay in a car is not very reliable you will get skips and stutters in populated areas, I believe this is because the wifi networks around you can interfere with the car network (driving through a wifi network on the same channel).