
My daughter’s beloved Asus HD7 stopped working today. It is out of warranty and I really rather not go through the expense of replacing it. I decided I had to crack open the case, but of course. The tablet is very similar to the ASUS HD7. Removing the back cover is similar to the first couple minutes of this video: Google Nexus 7 Tablet Repair Directions | DirectFix
*** Remember to remove your SD card before opening the case, you will destroy your SD slot otherwise.***
Do this at you own risk, I take no responsibility if you screw it up and trash your tablet. You probably should let the battery die first also.
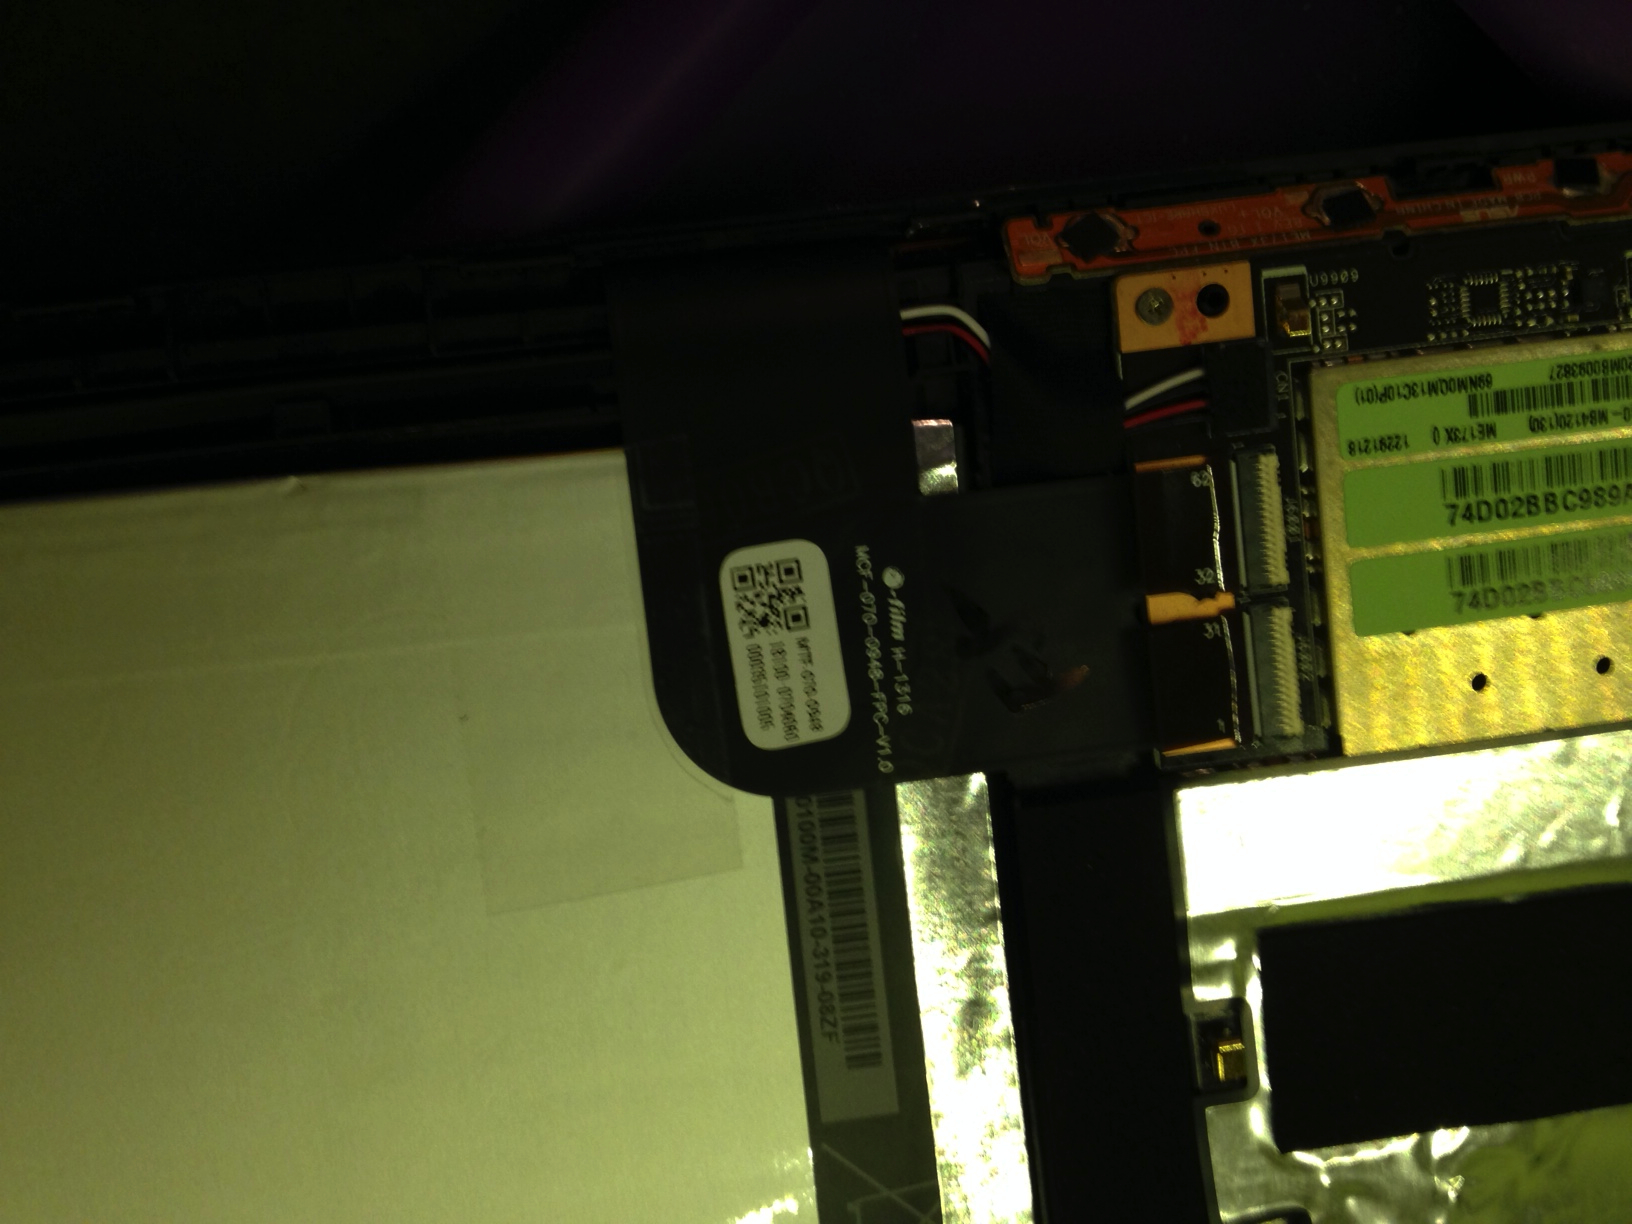
Once inside locate the connectors circled below:

Cut up a store loyalty card or something similar to fit the width of both connectors. Slide it under the handle tabs (my terminology) of the connector. Push toward the logic board connectors until the white lines on the flat cable are as close as the can get without overly forcing it to the board connectors.

If you use reckless abandon like i prefer and didn’t let the battery down (bad idea BTW)
you can hold down the power button to reboot (the pen is pointing at the right button)

Prevention: You really probably should use a high temp tape, I just used transparent tape to prevent it from sliding out again

This is where I put my tape. It is on the battery (which is why a high temp tape is recommended)
If these connectors a open close them carefully as seen in the picture below. You may find you need to open these with you fingernail or plastic pry tool, especially if the ribbon cam completely out. They open from the top side in this image. Please be careful and remember to close them when finished.

Good Luck. Hope this helps someone.

thanks I had the same problem with the tablet of my daughter now it si fixed Thanks
Thanks, your post have saved me a new tablet:-) Had same problem touchscreen workt half. Now its like new again!
Thank you very much!
My daugher dropped her MemoPad too, a couple of months ago. The result: glass broken (not too badly) and touch screen unresponsive. I had given up the device, but decided to open it before throwing it away. I noticed the loose connector, and started looking on the internet for a picture of the MemoPad’s interior. Your post was the first hit, and immediately confirmed my suspicion that this connector was the culprit. I followed your instructions, and now it’s working again! Never thought it could be so easy!
And if my daughter doesn’t like her tablet anymore, I can still hook it up to my car stereo the way you describe in your other post.
Thanks again!
Kris
It did, my friend, it did help someone. Thank you so much. My wife has the same tablet. In prying out the battery (glued underneath on left and right sides btw) to replace it, my tool slipped and I creased the ribbon and partially pulled the right one out. Dead zone on the left side of the screen. Your post saved my butt. I was able to push it back into place per your instructions.
Thank you very much – sorted my niece’s tablet out in no time!
When turning my daughters tablet on I will see the screen come on very dimly, hard to describe. The screen was replaced (cracked) a few months ago. Think it might be a connector?
possible. I just did this trick for the umpteenth time on my daughters. Sadly, my son’s Memopad has died. I am getting them new Zenpads
I don’t really know. I guess it is possible. However before cracking it open always browse through your setting thoroughly, especially if it is a child’s tablet. It could be related to the backlight auto adjusting or some other setting inadvertently pressed by the child. First I would uncheck settings>ASUS customized settings>Enable Smart Backlight adjuster. Also try disabling “smart saving”
Love to, but can’t see anything on the screen!
I notice that my two daughters tablets would mostly stop working after they dropped the tablets. I suspect what maybe happening is that when the tablet is dropped the battery, which is a heavy mass, moves in relation to the rest of the display. This can have the effect of pulling the LCD cables out of their connectors.
Hi!
My tablet just stopped working. As soon as I turn the screen off or on its showing a “green screen with alot of lines in it”
the touch does not work…
Would this might help me`?
Not sure. It is possible it is a loose connection. Check all the cables. Look at the battery see it it looks swollen, it may be putting pressure on the screen. Another option to try is:
-disconnect the battery
-wait a minute
-press power for a minute to discharge the capacitors
-then reconnect the battery and reasemble the tablet.
I am trying to replace the glass on my me173x and am not sure which way to push or pull the “handle tabs” on the ribbon cable connector to release it. In the picture where he is pushing with the cut up loyalty card, is he removing the cable or reseating it after installing the new glass?
The loyalty card method is only if the cable has slightly slipped but has not become completely disconnected. To open the tabs for the cables, gently pry up the white connector lock on the side opposite where the cable enters the connector. In the picture that shows the open and closed position, you would open the connector on the top (the side with the circuit board labeling or where the arrow points start). They can be stubborn and break easily so use care doing it, use a spunge tool.
Great tutorial. Thank you. It works perfectly now
Thanks, another tablet rescued. It was completely unresponsive, destined for scrap.
The connectors were shut but the tabs were completely loose. Once I figured out the connectors were shut, it was a 2 min job to get back in.
Thanks my tablet had finally stopped working after been temperamental for a few weeks, the dog had knocked it onto the floor. I opened it up to investigate as it was already useless and I could see the problem but was unable to fix it – using the corner of a credit card did the job and my tablet is like new.
thanks!!!!!!!!!!!!!!!!!!!!!!!!!! saved me some money!!!!!!
OMG, you’re a lifesaver! I didn’t quite understand the tape (where to put it to why), so I didn’t and it worked just fine. I’m assuming it’s to prevent them from sliding out again, but since it worked, I’m going to let it go for now. I was quoted $75 to fix it – SEVENTY FIVE DOLLARS!!! I just couldn’t justify half the original price of a 3 year old tablet and started googling what could be the problem. Thank you so much for posting this. My daughter is now a very happy camper 😀
Great glad it helped. Yes the tape is only to stop the ribbon from backing out again.
Worked a treat! Thanks so much, it didn’t make much sense at first but the pictures helped. Legend! 🙂
Thanks! Really helped.
What are logic board connectors
They are circled in red in one of the pictures. I meant the connections for the ribbon cable located on the logic board. Basically you are just pushing the ribbon back its connector. So it would be pushing the ribbon cable to the top of the tablet as oriented in the picture with the connectors circled in red. Adding the tape In the end is to try to prevent the cable backing out of the connector again. Hope this helps. Good Luck.
Thank you. Thank you. Thank you. To another 3 years!
Thank you so much this worked perfectly for me! My husband was ready to go buy a new tablet and now our old one works fine! Yay 😀 Your photos are very helpful too!